DIY

And, they’re done!

Ladies and gents, the curtains for our soon-to-arrive (eek! 9ish more weeks!) little girl are D-O-N-E! As in, no more huffing, puffing, squatting, standing, bending, stretching this big ol’ pregnant body to finish sewing these curtains!

In my last update, all I had left to do was line, sew, grommet and hang the curtains. No biggie, right? WELL! After a few hiccups with the sewing machine (it was in “a mood” for about a week — as in, it would not stop binding up), I got them finished!

I opted to line the curtains with dim out fabric to help block out any extra light that our horizontal blinds don’t block out…

…and then I simply measured, cut and installed grommets at the top of the fabric to easily slide back and forth on the drapery rod.

I will say that math is NOT my forte and that it took me many more hours (yes, HOURS) than I’d like to admit to figure out the exact spacing of the grommets. After some swear words, a nap and a tall glass of gingerale with lots of ice (and maybe another nap thrown in), I figured out the spacing. The actual cutting out of the grommet holes and the installation of the grommets was easy — phew!

And, here they are in all their glory! Pressed, hung and absolutely just as I hoped!

Totally, 100% worth all of the hard work, swearing, sweat, maybe a tear or two and savings by DIY-ing them myself. Oh yea, and the satisfaction of being able to tell my girl everyday for the rest of her life that, “Mommy made you these curtains.” Poor kid is going to be burdened with these curtains for the rest of her life. I hope her future husband likes them.

As for the rest of the room? I have nothing to show you. NOTHING. ZILCH. NADA. WE DON’T EVEN HAVE ELECTRICITY IN THIS ROOM! But, that’s a story for another time….

Aside from the curtains, the rest of the room sits empty…and I keep sitting cross-legged willing this baby not to make an early appearance because we are not ready for her arrival. Yes, the crib and dresser are on order and we even broke down and bought a glider for the room (more on that later). I hope that everything arrives in the next four weeks, leaving me 5ish weeks to get everything started and finished.

Plenty of time, right? And, who am I kidding….does the baby really care about ANY of this?! I’m thinking no. Phew, the pressure is off! 🙂

Source list for this project:
Fabric: Varenna Coral from Tonic Living
Lining: Dim Out from Tonic Living
Grommets: Dritz 1-9/16-Inch Inner Diameter Curtain Grommets, 8-Pack, Pewter from Amazon.com
Drapery Rod: Allen + Roth Metal Single Curtain Rod, Pewter from Lowes

Resources:
I came across this great tutorial on Pinterest to help refresh my memory on how to sew lined curtains with grommets. I highly recommend anyone wanting to tackle DIY curtains to visit Ginger Freckle and read her tutorial.

To Sew, or Not to Sew?

After a few days of humming and hawing, I finally made a decision on whether to sew the curtains for baby girl’s room myself, or to have them sewn for me.

The verdict: DIY!

Why? Well, as much as the lazy, pregnant girl inside of me would love to have the folks at Tonic Living sew the curtains for me, the practical, can-do girl inside of me is saying to suck it up and sew! Also, the budget-loving, money-saving girl inside of me remembered that we still need to find a rug for the room to help dampen any hardwood floor squeaks and noises. The money saved on custom sewing can go towards the rug budget. Practicality wins again. Sigh…

So, it looks like my Christmas break (bearing that the fabric arrives before Christmas…fingers crossed!) will be spent doing this…

This…

And a more of this…

Wish me luck!

DIY Wedding Gift

We are headed to a wedding tomorrow for my dear cousin Lindsay and her fiancé Mark and it’s going to be a fabulous day with picture perfect weather. Lindsay and I spent many hours as little girls playing “wedding” in my Mom’s wedding dress, so it will be amazing to see Lindsay walk down the aisle. I’m sure there will be tears!

With weddings on the mind, I thought I would share a DIY wedding gift idea that I gave two of our friends, Lisa and Pete, on their wedding day back in November — a wedding invitation keepsake.

Lisa and Pete’s invitation was gorgeous — it featured a unique design in black, yellow and maroon. I wish I snapped a before photo of the invite. It was so them!

To make the keepsake, I simply cut the wedding invitation in small strips (approximately 1 cm each) using a sharp craft knife and ruler and curled the pieces around a pencil. Next, I inserted the invitation curls into the circular glass ornament being very careful not to break the delicate glass.

To personalize the ornament, I used my Silhouette machine and black vinyl to add Lisa and Pete’s names and wedding date on the ornament.

To top off the piece, I added some charms that I thought represented their union: trust, faith and love. A simple black ribbon was looped through the top of the ornament for hanging.

I was really excited to give this personalized gift to Lisa and Pete, especially since they both have an appreciation for hand-made items. It is currently hanging in their living room as a special reminder of their wonderful wedding day.

With wedding season in full swing, do you have any DIY wedding gift ideas that you like to give? I’d love to hear about them!

Playing in the Dirt

As I hoped, I got to spend some much-needed time playing in the dirt this weekend. When I think of the landscaping on our property, I think of it in zones: front garden, front side garden, back garden and back side gardens. If I thought of it any other way, I would be totally overwhelmed because….well, we have a lot of gardens and to tend to them all in one day is impossible! On Sunday, Mother Nature granted me a gorgeous day, so I got down to work on the front gardens (solo, I might add, as Ted was in Montreal for the Grand Prix — lucky guy!)

I was so gung ho to get started that I forgot to get before photos of the front garden. Really, it wasn’t in bad shape — it just needed a heavy de-weeding, some plantings and a serious mulch session.

But, since everyone loves a before and after, here is the before picture — like “circa-2008-what-the-heck-have-we-gotten-ourselves-into” before picture.

Yep. It needed some work…..as in new interlocking, roof, upper windows, garden beds, plants, trees and overall curb appeal. Granted, when we moved into the house in 2007, there were gardens in the front with shrubs, perennials and other plants. However, being the over-zealous, eager, first-time homeowner that I was five years ago, my Dad and I ripped out the front garden (I see a trend — Ted was also away that weekend at the Grand Prix in Montreal) and then it sat empty for over a year. Dreadful. The neighbours hated us young kids.

As you can see, over the past four years, we have done a lot of work to the front. The interlocking, new roof, upper windows and landscaping have all been completed. We’re at that nice spot in our home ownership experience where we are in maintenance mode, not major project mode.

But, back to Sunday. After I gave the garden a good weeding and tilling, I made up a shopping list before heading to the garden centre. I always find that this helps me focus my plant search, rather than wandering around aimlessly and choosing plants that may not be the best fit for our garden. I knew that I needed ground cover and two more hydrangea to add to my lonely, single hydrangea.

I ended up purchasing two Endless Summer Blushing Bride Hydrangea (which will bloom lovely light pink flowers just like my existing hydrangea) and eight White Nancy Lamium plants for ground cover around our boulders and ‘Pendula’ Weeping Pea Shrub.

I looked at a few ground cover options, but I ultimately chose the White Nancy Lamium in honour of Ted’s sister Nancy who is moving across country in a matter of days. It seemed fitting — like a part of her will remain in Ontario, even though she’s in British Columbia. *tear*

The hydrangea seem happy in their new home and I look forward to enjoying their blooms all summer long.

With the hydrangea in the ground, I got to work on the Lamium around the boulders…

…and under the Pea Shrub.

After that was all done, I lugged bags and bags of mulch (solo!) and put down a nice generous layer to keep the weeds at a minimum and the moisture in.

It was a successful day!

Next weekend: tackling the front side garden.

But, first, I need a massage! Sore. Muscles. Whoa.

Linking up with…
{aka} design
House of Hepworths
Liz Mare Blog

DIY Spice Rubs for Father’s Day

My Dad is a great cook. In fact, he’s amazing! He has this knack when it comes to building delicious meals. Not one to follow a recipe, he tends to turn to his ingredients for inspiration and crafts dishes with what he has on hand.

With Father’s Day just around the corner, I thought I would share my gift for my dear ol’ Dad from last year — DIY spice rubs in mason jars.

My Dad loves to barbecue all year-long, so this was the perfect gift idea for him. I know that he likes to grill a variety of meats and poultry, so I made this my focus, but I also included some spice rubs that would be suitable for fish.

This is an easy DIY project to start and complete in an afternoon — all it takes is a little research online for suitable spice rub recipes and a trip to the grocery or bulk food store for ingredients.

I chose to package my custom spice rubs in mason jars, complete with grey striped fabric and colourful ribbon. To identify what each spice rub was and its suitable uses, I designed and printed labels on cardstock that I attached to each jar.

I’m happy to report that this Father’s Day gift is Dad approved — he loved it, as I’m sure most barbecue-lovin’ Dads would.

Do you have any great DIY Father’s Day gift ideas? I’d love to hear them!

Linking up with…
Home Stories A 2 Z
Tip Junkie
Liz Marie Blog
{aka} design
House of Hepworths
Homework

Finally! After four years….

….our interlock is sealed!

It has been a project on our to do list for a looooong time, but it never got done. Part of it was fear — “What if we do it wrong? What if we wreck the patio?”

It was also very daunting. We have a large patio in the back — a lot of surface area needed to be covered.

But, after so many years of neglecting this must-do job, we finally did it. We couldn’t have had a better weekend for it — sunshine, still air and comfortable temperatures.

Doing one coat of sealer took about three hours.

The fumes? Noxious! Even outdoors.

I swear, I was high. My fine motor skills were compromised and my head was pounding!

Four cans of sealer later, the first coat was done. We still have a second coat to go, which will bring the colours of the interlock out even more.

The backyard has come a long way since we bought the house. One day I’ll pull together a “before, during and progress” post. It’s been a wild ride!

Completing this final step is kinda a big deal!

I’m on a roll!

After a full day of work in the office, I was itching to get home and sew like a mad woman. After giving Mason a pat hello (and a quick break outside), I ran down to my make-shift sewing space (read: TV trays in front of the couch) and got busy.

On my lunch hour, I found the perfect woven fabric in navy to complement some ikat-inspired fabric that I picked up in Buffalo at Jo-ann’s. I love a deal — and the woven fabric was exactly that at just $2/metre from Fabricland. Score!

I’m very pleased with the finished product, especially the custom piping.

I love how the navy fabric on the back highlights the piping and gives the pillow an entirely different look. I’m also loving the concealed zipper — it’s very forgiving and looks rather sharp.

I’m very pleased with how the textiles for our living room/dining room are coming together. The space is now bursting with colour — navy, orange and white.

Since I started undertaking this project and sharing it on this blog, Twitter and Instagram (you can find me by searching: The236), I’ve had a few requests for custom sewing work. Such a lovely compliment — I just wish I had more hours in a day to sew for others! Maybe one day! In the meantime, I’m having fun scouring fabric shops and sewing to my heart’s content.

Drab to Fab: Ribbon Board

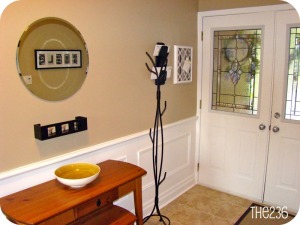
Yesterday I showed you my fancy, new-to-me mail slot. It was a $2.99 find at my local VV Boutique. Sure, it needed some TLC to bring it into this century, but it was nothing that a can of chalk board spray paint couldn’t handle.

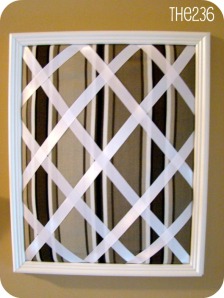
I also gave you a sneak peek of my DIY ribbon board. Pretty, huh? I think so. It didn’t start out that way though.

One day while leaving work, I passed by the Give & Take Table in our underground parking garage. Normally I don’t bat an eyelash at the table because it’s usually full of junky items that people really should have thrown out. On the table was a wooden frame with broken glass. Garbage, right? It definitely could have passed for it, but I ended up grabbing the frame anyway because it was really deep, almost like a shadow box. I knew I could turn it into an upholstered pin board.

I immediately brought the frame home, threw out the busted up glass and gave it a coat of white spray paint. As you can see, I was so intent on starting this project that I didn’t get a “before” shot. Bad blogger, I know. 🙂

Next, I headed off to my local Fabricland and went straight to their remnant box. For a few bucks, I got a yard of stripped grey and white outdoor fabric and some white ribbon.

The process of putting it together was simple. I layered some batting over a piece of cardboard to fit the frame, then layered on the fabric. To secure the fabric and batting, I used some duct tape. Easy, right? Then, I arranged the ribbon in a diagonal grid and secured that to the back of the fabric covered cardboard using, of course, more duct tape.

Here’s the final product…

The ribbon board is perfect next to the mail slot, as we can stick invitations, important notices and other reminders on the board so they don’t get lost or thrown out by accident. It also gives the foyer a pop of colour.

How do you handle clutter in your foyer? I’d love to hear about it!

Linking up with…
Chic on a Shoestring Decorating
I Heart Organizing

It’s the Little Things

Sometimes, it’s the little things that make a difference. Take our basement pantry, for instance.

Our basement pantry is where we keep the bulk of our dry foods, paper products and cleaning supplies since our kitchen is seriously lacking cabinet pantry space. It’s located in our unfinished laundry/utility room, just across from the all-important beer fridge and upright freezer.

For months, the pantry was no longer a pantry…..it was a dumping zone. It was high time to organize, purge and re-establish some much needed order.

So, what did I do on my vacation?

This.

Ahhh….all is well in the world again. All it took was a 3-Drawer Storage Cart to store extra Tupperware containers, some Skubb Storage Boxes and a Hutten 9-Bottle Wine Rack from IKEA. Now everything is contained with like items and easy to get to.

It may not be the prettiest of pantries, but it sure is handy and does the trick!

Linking up with…
Chic on a Shoestring Decorating 

Operation: Jewellery Storage


Jewellery. It’s beautiful, dresses up an outfit and is fun to purchase or receive as a gift. There is no such thing as having too much jewellery (isn’t that every girl’s dream?)….but, what to do with all of the jewellery?

For years, I had my jewellery stashed away in organizers in my closet. It was a great system — it kept everything neat and organized. And, that’s about it. Neat and organized. Oh, and stashed away.

When getting ready in the mornings, I couldn’t be bothered to dig through my organizers to pick out accessories. So, I never really wore my jewellery, except for a few key pieces. I needed to find a solution, and when I was working on my Closet Vanity project, I came across this wall-hung jewellery idea. I had to make it!

Ted had some leftover baseboard trim stashed away in the basement that was perfect for this project. All I needed was a piece of 1″ pine and trim to top it off. And, someone to cut the pieces for me!

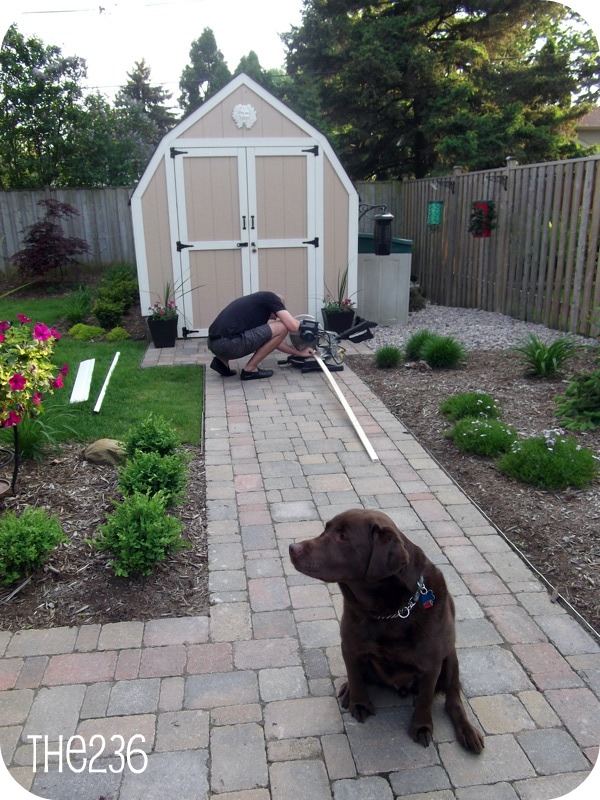
(Yes, my husband is cutting the trim in his slippers! And, of course, Mason is supervising.)

Next, I needed to stack the three pieces of trim, glue and nail them together, fill the holes and silicone the gaps. I chose the spray paint the organizer in Rust-Oleum Painter’s Touch Multi-Purpose Paint in Heirloom White.

The last step was to add upholstery tacks to act as the hangers. This required a lot of measuring, patience and thumbs (I hammered my fingers more times than I’d like to remember). I chose to do three lines of tacks in equal distances to maximize the number of pieces I can hang.

And, ta-daaaaaa…..here is the final piece hung up in my Closet Vanity.

As you can see, I still have plenty tacks to fill up, which means I can go out and buy more jewellery!….or, even better, receive them as gifts (Ted, are you listening?)

Overall, this project was easy to complete with minimal tools and resources. It’s also a great use of leftover pieces of trim. Also, I completed this project as party of Young House Love’s Pinterest Challenge. It feels good to actually complete a project that I pinned on Pinterest a long time ago! You can follow me on Pinterest over here.

How do you like to organize your jewellery? I’d love to hear about it!

Linking up with…
Thrifty Decor Chick
Young House Love
Beneath My Heart
House of Hepworths
Chic on a Shoestring Decorating