In the Foyer

DIY Wooden Crates

My husband Ted is a big beer lover. Huge! Last year, a friend got him hooked on brew-your-own beer and every few months he goes to our local brewery and bottles his favourite organic white beer.

Ted inherited some reusable plastic beer bottles from a friend and two ratty cardboard boxes to transport the beer from the brewery to beer fridge. The cardboard boxes have seen better days — like 10 years ago. It was time to replace them with solid, wooden crates. But, at $50 a pop retail (plus tax), we decided to forego forking over the cash and build the crates ourselves!

First, Ted did up a quick sketch of his crate design. Then, we headed to Home Depot to buy some wood. We opted for $3 a board spruce wood. Cheap and cheerful! When we got home, we locked ourselves away in our freezing cold garage and made our measurements and cuts.

Building the first crate was like putting a puzzle together. We definitely needed two sets of hands. While Ted held the wood together, I used to air nailer — my favourite tool! The final result was a super sturdy spruce wood crate that beat the pants off of that yucky, old cardboard box! I love Ted’s expressions in these photos!

Originally, we planned to only build two crates, but we were having such a ball that we ended up building four crates. After a few hours, we were done and here is a shot of the fruits of our labour — four beautifully built crates made by us!

And, here’s the crates holding 24 bottles of Ted’s freshly bottled beer. He added some simple handles to the sides of his crates for easy transport.

We had two crates left over, so I decided to dress one up with some vinyl lettering using my Silhouette Cameo. Just like my first project, vinyl lettering is a super easy (and inexpensive) way to dress up any piece. The crate now sits on our front porch and it is filled with mums to celebrate fall. When Christmas rolls around, I can easily change the vinyl lettering and swap the mums out for fresh, winter greenery. Oh, I can smell the pine needles now!

At $10 a crate, we couldn’t go wrong. In fact, we managed to build four crates for less than the price of one $50 crate. Plus, we had the satisfaction of designing and executing a project all in one evening and working together as a team. Not bad, not bad!

Linking up with…
Chic on a Shoestring Decorating 

Before & After: A Restoration Hardware Inspired Glass Cloche

For quite some time, I have been eyeing these 1920’s French Glass Cloches from Restoration Hardware. For $69-$99 a pop, these beautiful cloches were not in my budget.

During my weekly visit to my local thrift store (okay, fine….tri-weekly visit!), I spotted this beauty. For $2.99 for the base and glass cloche, I quickly snatched him up. Here’s what it looked like before:


The glossy wood base just wasn’t calling to me, plus it blended into the furniture. I wanted this little glass cloche to pop — time to break out my trusty can of Rustoleum black spray paint!

And, here’s the final product — all dressed up for fall:

I absolutely love it! It may not be as substantial or tall as the Restoration Hardware glass cloche, but it’s the perfect size for our foyer console table. The beauty of the cloche is that it can be changed to suit the season — pine cones in the winter, a nest with faux robin eggs in the spring and sand dollars and shells for the summer.

It’s amazing what a visit to the thrift store can turn up!

Linking up with…
I Heart Organizing 

Fabric Wrapped Fall Candle

In this post, I happily shared with you my fall decor for this season. Mice, mums, pumpkins and a cute Chocolate Lab — oh, it doesn’t get any better!

Part of this year’s fall decor was an easy, fabric wrapped fall candle. I wanted the fill my foyer with the smells of fall — specifically mulled apple cider. Here’s how I took a boring, inexpensive candle and turned it into a beautiful fall accent.

First, I purchased this Mainstay Three-Wick Candle from Walmart in Mulled Cider for less than $5.00. Oh, does it ever smell good!

Next, I went through my box of fabric scraps and decided on this beautiful outdoor fabric that I had on hand from another project. I simply cut the fabric to size using pinking shears.

I carefully attached the fabric to the candle with a hot glue gun. I also glued a variety of buttons onto the fabric for some added interest.

Oh, does the mulled cider ever smell good when you walk in the front door!

This project was so easy and affordable, I had to make a few extras as gifts. With Thanksgiving just around the corner, these candles are a perfect hostess gift, or are great to give to someone you are thankful for. In my case, this candle was for our cleaning lady. Oh, how thankful we are for her!

I added some light blue ribbon and a gift tag to complete the look.

So, there you have it! An easy, affordable candle project that you can complete in no time flat. Who doesn’t love a project like that?!

Welcome, Fall!

I love fall. In fact, I think I love decorating for fall more than Christmas (although, that is fun too!)

For the past few months, I have been pinning away on Pinterest all of my fall inspiration. So many great ideas out there!

This past weekend, I managed to find some time to “fall-ify” The 236. Here’s how it all turned out!

I love decorating with mums, pumpkins and fall foliage. I opted for a variety of bright, colourful mums to add some punch to the front porch.

These cute little pumpkins were just too sweet! I bought a whole bag of them and stacked two on top of each other. Aren’t the colours beautiful?

The next area that I addressed was the front foyer console table. Normally a drop zone for crapola, I decided to dress the console with more fall decor.

Pumpkins, fall foliage in an old tea pot and a delicious smelling mulled apple cider candle — yes please! The candle wrapped in fabric was a quick and easy project — more on that in another post.

And, of course, what’s fall decor without a token glass cloche? I snagged this little guy up at the thrift store and he just completes the space. More on him later as well!

Last, but not least, the stairs. This is our first official holiday where I can dress the new stairs. If you recall, our foyer looked like this since we moved into the house. Not so pretty, right?

I had been eyeing these Martha Stewart Crafts Mice Silhouettes for quite some time. I was happy to see that Michael’s carries them, so I made sure to snag a package last time I was there.

Now, I have to warn you — the next bunch of photos may kill you with cuteness. Say hello to The 236’s resident Chocolate Lab named Mason.

Ain’t he cute? And the stairs — those mice make my day every time I walk in the front door!

So,there you have it — The 236 is all ready for autumn. Bring on the fallen leaves, warm sweaters and pumpkin pie!

Linking up with…
House of Hepworths
Tidy Mom
Serenity Now
Remodelaholic
Chic on a Shoestring Decorating
Itsy Bitsy Paper Blog
Beneath My Heart
Dream Home DIY

Drab to Fab: Ribbon Board

Yesterday I showed you my fancy, new-to-me mail slot. It was a $2.99 find at my local VV Boutique. Sure, it needed some TLC to bring it into this century, but it was nothing that a can of chalk board spray paint couldn’t handle.

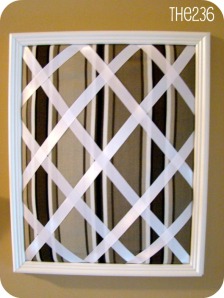
I also gave you a sneak peek of my DIY ribbon board. Pretty, huh? I think so. It didn’t start out that way though.

One day while leaving work, I passed by the Give & Take Table in our underground parking garage. Normally I don’t bat an eyelash at the table because it’s usually full of junky items that people really should have thrown out. On the table was a wooden frame with broken glass. Garbage, right? It definitely could have passed for it, but I ended up grabbing the frame anyway because it was really deep, almost like a shadow box. I knew I could turn it into an upholstered pin board.

I immediately brought the frame home, threw out the busted up glass and gave it a coat of white spray paint. As you can see, I was so intent on starting this project that I didn’t get a “before” shot. Bad blogger, I know. 🙂

Next, I headed off to my local Fabricland and went straight to their remnant box. For a few bucks, I got a yard of stripped grey and white outdoor fabric and some white ribbon.

The process of putting it together was simple. I layered some batting over a piece of cardboard to fit the frame, then layered on the fabric. To secure the fabric and batting, I used some duct tape. Easy, right? Then, I arranged the ribbon in a diagonal grid and secured that to the back of the fabric covered cardboard using, of course, more duct tape.

Here’s the final product…

The ribbon board is perfect next to the mail slot, as we can stick invitations, important notices and other reminders on the board so they don’t get lost or thrown out by accident. It also gives the foyer a pop of colour.

How do you handle clutter in your foyer? I’d love to hear about it!

Linking up with…
Chic on a Shoestring Decorating
I Heart Organizing

Drab to Fab: Mail Slot Makeover

Clutter is a MAJOR problem in our foyer. Shoes, bags, papers and mail. Oy, the mail!

For months, I was looking for an effective mail solution – something that would neatly organize our mail while it sat for us to read. After re-doing our foyer, I needed a solution STAT – the mail pile was starting to turn into an accessory and it wasn’t my idea of beautiful decor.

If you follow me on Pinterest, you would have noticed a number of pins for mail organization. Lots of ideas, but nothing that I could easily and quickly execute. Then, one day while strolling through my local VV Boutique, I came across this beauty.

Gotta love that honey-coloured wood. Best of all, the price at a whopping $2.99. Yup, sold. This baby was coming home with me.

I had a few ideas of what to do with this mail slot, but opted to keep it simple. Black is the accent colour of our foyer, so I grabbed my can of Rust-Oleum Specialty Chalk Board Spray and went to town.

And, here’s the final product…

Plenty of space for our mail and it’s located right by the front door near the coat rack for easy access.

What’s the ribbon board next to it? More on that tomorrow!

Linking up with…
Chic on a Shoestring Decorating
I Heart Organizing 

Before & After: The Foyer

If you follow me on Twitter, you have likely been “tw-eased” by me a few times with some photos of our house. Having a full-time job, plus updating the house and trying to swing a social life has been difficult to find time to blog. But, I’m making time now to show you some before and afters of our recent (ahem…four years in the making) foyer overhaul.

When we bought the house from Ted’s parents, the foyer looked like this:

Just to give you some perspective, our foyer has an entryway that runs perpendicular to our stairs. To the left is our front door and to the right is our back door. There are stairs leading up to the main floor of our house and stairs to the basement. This is a super high traffic area of our house!

The foyer floor was peel and stick blue vinyl tiles, the stairs (and the entire main floor) were covered in a blue/grey carpet that had seen better days and the honey oak railing was one screw close to falling down. It was due time to give it a fresh overhaul.

First, Ted removed the carpet from the stairs and the entire main level of the house. We are fortunate that the original hardwood floors were in decent condition (except for the living room and dining room where there was only plywood under the carpet), so we knew that we would one day have them refinished.

Skip ahead to this past Christmas and we finally were able to have the hardwoods sanded, stained and sealed. We opted to go with a professional and we couldn’t be more pleased with the final result. He did a great job sanding out any imperfections and he was able to match the stain to the colour of our living room/dining room/kitchen floors (which happened to be a vinyl plank…more on that in another post!) 🙂

Before we had the floors refinished, Ted ripped out the original banister, which was also known as “The Death Trap.” To make sure that no one, including our 6-year-old chocolate lab named Mason, went over the rail, we beautifully fashioned a “safety guard” out of TV trays and yellow caution tape (don’t try this at home, folks!)

At this point, we were ready for our hardwood floor guy to come in and refinish the floors for us. Let me mention that this was all being done two weeks before Christmas. We also had to move out of our house for a week while the floors were being done. Thank goodness for parents who take in their grown children (Thanks Dad!)

Here’s a few snapshots from the process. I was able to pop in to the house during the week the floors were being done to capture the progress.

The stairs being sanded:

The stairs being stained:

The final product:

Our next task was to tackle the foyer flooring and our railing. We also hired a professional for this….Steve, our trusty family friend/contractor for The 236. He did a great job installing a new tile floor in the foyer. We had some tiles left over from our basement bathroom remodel that we used.

For the railing, we saw a photo in one of Home Depot’s magazines and fell in love with it. We gave Steve the magazine and told him to go for it. Here’s some snapshots of the progress.

Steve hard at work installing the new custom railing:

The railing pre-stain (I was the lucky one to have to stain and urethane the railing):

Ted very excited that the railing was stained and sealed (yes, we decided to remove each ballister to make the entire process easier). I used left over stain from the hardwood floor refinishing to an exact match:

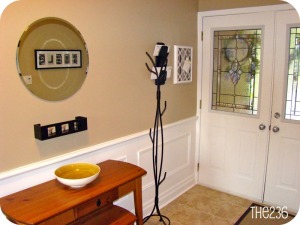
The final product — complete with all new baseboards, door casings and paint for the foyer and stairs. The walls are painted in Benjamin Moore’s “Kangaroo” and the trim is done in Benjamin Moore’s “Chantilly Lace”:

I dressed up the foyer with some furniture and accessories that I already had on hand, like the console nesting table, decorative bowl and tree-inspired coat rack. I did add the circular mirror above the table for those out-the-door hair and make-up touch-ups, and the cute little candle shelf that I found at a local thrift store for $4.99:

I love the final product and even though it took four years to get the foyer to this point, we’re thrilled with how functional and welcoming the space is for us and our guests.

The last project that I have to do in this area of our home is to find a functional and eye-pleasing way to sort incoming mail. Right now, our poor decorative bowl gets buried under mail and newspapers. If you have a suggestion, leave me a comment or catch me on Twitter!

Thanks for stopping by The 236!

Linking up with…

HookingupwithHoH

Addicted 2 Decorating’s 2011 Year in Review: Room Makeovers