Spray Paint

In the Workshop: Custom Wood Sign for a Sweet Baby Boy

When Ted and I found out that our friends Mark and Melissa were expecting their first little one, we were so excited! Mark and Melissa are a truly awesome couple. Mark has a sense of humour and wit like no one we have ever met and Melissa is so sweet, kind and caring — oh, and a wicked awesome baker! They are, hands down, going to be fantastic parents!

For a shower gift, I decided to make a personalized custom wood sign for their soon-to-arrive baby boy named Nole. When thinking of a theme for Nole’s sign, I decided on trains. What little boy doesn’t love a choo-choo train?

To make the sign, I used a 24″ x 5″ piece of wood, a vinyl stencil using my Silhouette Cameo and layers of white, black and red spray paint. After the piece was dry, I distressed the sign to give it some added character.

After gifting the sign to Mark and Melissa, I found out that the theme for Nole’s nursery is airplanes. This little boy is going to be in the know when it comes transportation! Congratulations Mark and Melissa — we can’t wait to meet Nole.

—-

If you are interested in purchasing a custom wood sign of your own, please contact me for details and pricing.

In the Workshop: Custom Wood Travel Sign

“Travel is the only thing you buy that makes you richer” — Unknown

When I first read that quote,  I instantly thought of Ted’s parents — Chris and Bill. As retirees, they love spending their time traveling and planning vacations. Their love of travel is what spurred them to downsize their home (which is now our home) and buy a condo that they could close the door and head off on an adventure without worry.

When I selected Chris’ name for our Christmas gift exchange, I decided to make her a custom wood sign featuring the travel quote.

Travel is the only thing you buy that makes you richer

To make the sign, I used a 24″ x 5″ piece of wood, a vinyl stencil using my Silhouette Cameo and layers of white and black spray paint. After the piece was dry, I distressed the sign to give it some added character.

Now, when Chris and Bill are planning their next vacations, they can be reminded of all of the riches they collected along their travels and look forward to collecting more. Happy trails you two!

—-

If you are interested in purchasing a custom wood sign of your own, please contact me for details and pricing.

Before & After: A Restoration Hardware Inspired Glass Cloche

For quite some time, I have been eyeing these 1920’s French Glass Cloches from Restoration Hardware. For $69-$99 a pop, these beautiful cloches were not in my budget.

During my weekly visit to my local thrift store (okay, fine….tri-weekly visit!), I spotted this beauty. For $2.99 for the base and glass cloche, I quickly snatched him up. Here’s what it looked like before:


The glossy wood base just wasn’t calling to me, plus it blended into the furniture. I wanted this little glass cloche to pop — time to break out my trusty can of Rustoleum black spray paint!

And, here’s the final product — all dressed up for fall:

I absolutely love it! It may not be as substantial or tall as the Restoration Hardware glass cloche, but it’s the perfect size for our foyer console table. The beauty of the cloche is that it can be changed to suit the season — pine cones in the winter, a nest with faux robin eggs in the spring and sand dollars and shells for the summer.

It’s amazing what a visit to the thrift store can turn up!

Linking up with…
I Heart Organizing 

Drab to Fab: Ribbon Board

Yesterday I showed you my fancy, new-to-me mail slot. It was a $2.99 find at my local VV Boutique. Sure, it needed some TLC to bring it into this century, but it was nothing that a can of chalk board spray paint couldn’t handle.

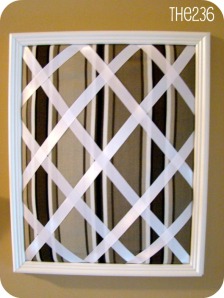
I also gave you a sneak peek of my DIY ribbon board. Pretty, huh? I think so. It didn’t start out that way though.

One day while leaving work, I passed by the Give & Take Table in our underground parking garage. Normally I don’t bat an eyelash at the table because it’s usually full of junky items that people really should have thrown out. On the table was a wooden frame with broken glass. Garbage, right? It definitely could have passed for it, but I ended up grabbing the frame anyway because it was really deep, almost like a shadow box. I knew I could turn it into an upholstered pin board.

I immediately brought the frame home, threw out the busted up glass and gave it a coat of white spray paint. As you can see, I was so intent on starting this project that I didn’t get a “before” shot. Bad blogger, I know. 🙂

Next, I headed off to my local Fabricland and went straight to their remnant box. For a few bucks, I got a yard of stripped grey and white outdoor fabric and some white ribbon.

The process of putting it together was simple. I layered some batting over a piece of cardboard to fit the frame, then layered on the fabric. To secure the fabric and batting, I used some duct tape. Easy, right? Then, I arranged the ribbon in a diagonal grid and secured that to the back of the fabric covered cardboard using, of course, more duct tape.

Here’s the final product…

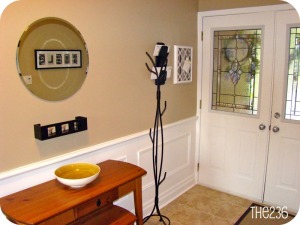
The ribbon board is perfect next to the mail slot, as we can stick invitations, important notices and other reminders on the board so they don’t get lost or thrown out by accident. It also gives the foyer a pop of colour.

How do you handle clutter in your foyer? I’d love to hear about it!

Linking up with…
Chic on a Shoestring Decorating
I Heart Organizing

Drab to Fab: Mail Slot Makeover

Clutter is a MAJOR problem in our foyer. Shoes, bags, papers and mail. Oy, the mail!

For months, I was looking for an effective mail solution – something that would neatly organize our mail while it sat for us to read. After re-doing our foyer, I needed a solution STAT – the mail pile was starting to turn into an accessory and it wasn’t my idea of beautiful decor.

If you follow me on Pinterest, you would have noticed a number of pins for mail organization. Lots of ideas, but nothing that I could easily and quickly execute. Then, one day while strolling through my local VV Boutique, I came across this beauty.

Gotta love that honey-coloured wood. Best of all, the price at a whopping $2.99. Yup, sold. This baby was coming home with me.

I had a few ideas of what to do with this mail slot, but opted to keep it simple. Black is the accent colour of our foyer, so I grabbed my can of Rust-Oleum Specialty Chalk Board Spray and went to town.

And, here’s the final product…

Plenty of space for our mail and it’s located right by the front door near the coat rack for easy access.

What’s the ribbon board next to it? More on that tomorrow!

Linking up with…
Chic on a Shoestring Decorating
I Heart Organizing 

Operation: Jewellery Storage


Jewellery. It’s beautiful, dresses up an outfit and is fun to purchase or receive as a gift. There is no such thing as having too much jewellery (isn’t that every girl’s dream?)….but, what to do with all of the jewellery?

For years, I had my jewellery stashed away in organizers in my closet. It was a great system — it kept everything neat and organized. And, that’s about it. Neat and organized. Oh, and stashed away.

When getting ready in the mornings, I couldn’t be bothered to dig through my organizers to pick out accessories. So, I never really wore my jewellery, except for a few key pieces. I needed to find a solution, and when I was working on my Closet Vanity project, I came across this wall-hung jewellery idea. I had to make it!

Ted had some leftover baseboard trim stashed away in the basement that was perfect for this project. All I needed was a piece of 1″ pine and trim to top it off. And, someone to cut the pieces for me!
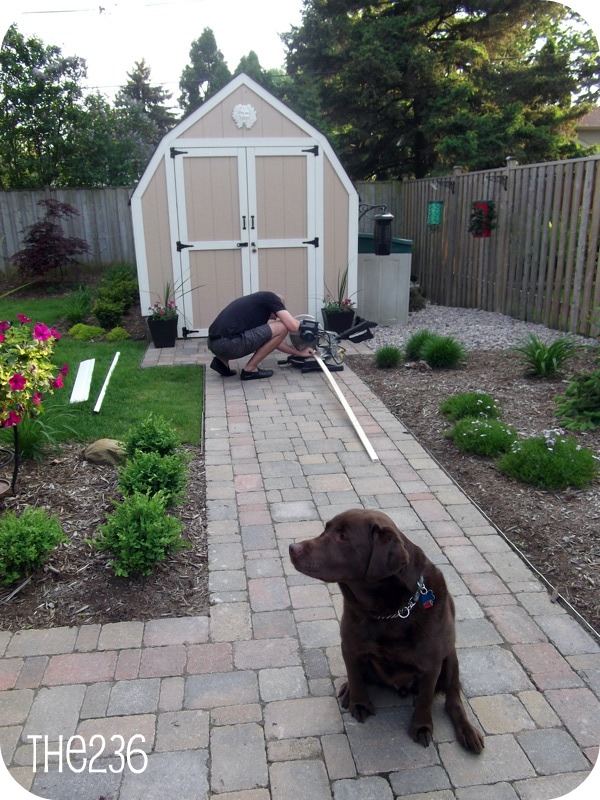
(Yes, my husband is cutting the trim in his slippers! And, of course, Mason is supervising.)

Next, I needed to stack the three pieces of trim, glue and nail them together, fill the holes and silicone the gaps. I chose the spray paint the organizer in Rust-Oleum Painter’s Touch Multi-Purpose Paint in Heirloom White.

The last step was to add upholstery tacks to act as the hangers. This required a lot of measuring, patience and thumbs (I hammered my fingers more times than I’d like to remember). I chose to do three lines of tacks in equal distances to maximize the number of pieces I can hang.

And, ta-daaaaaa…..here is the final piece hung up in my Closet Vanity.

As you can see, I still have plenty tacks to fill up, which means I can go out and buy more jewellery!….or, even better, receive them as gifts (Ted, are you listening?)

Overall, this project was easy to complete with minimal tools and resources. It’s also a great use of leftover pieces of trim. Also, I completed this project as party of Young House Love’s Pinterest Challenge. It feels good to actually complete a project that I pinned on Pinterest a long time ago! You can follow me on Pinterest over here.

How do you like to organize your jewellery? I’d love to hear about it!

Linking up with…
Thrifty Decor Chick
Young House Love
Beneath My Heart
House of Hepworths
Chic on a Shoestring Decorating 

Drab to Fab: Outdoor Side Table

Here’s a quick Drab to Fab update to show you one of my recent projects — a rusty, old outdoor side table revamp.

A few summers ago, Ted and I bought a patio table with four chairs and this side table from a garage sale. We paid $50 for the whole set and it served us well for three years. Finally, after saving our pennies, we were able to upgrade our set to a beautiful outdoor sectional couch with cantilever umbrella (more on that in another post).

We ended up selling the patio table and four chairs, but hung on to this side table because it was handy to have beside the BBQ. As you can see, it was looking worse for wear, so I wanted to spruce it up a bit.

Drab outdoor side table (and Mason!)

Spray painting the table was an obvious choice, so I headed to Home Depot and bought a can of Rust-Oleum Hammered Spray in Brown. I chose to go with a hammered finish, since the table already had imperfections — I didn’t want to highlight them with a flat finish.

My originally plan was to dismantle the entire table and remove the glass to make the job go quicker, but the glasses didn’t want to budge. I had to cover the glass in craft paper on both sides and tape it off. Then, I went to town spraying the table (and a few other projects which I’ll share with you later).

Spray painting in the garage

After a few coats, here is the final product (sorry, my iPhone doesn’t take the best photos).

Finished table — made fab!

It’s the perfect fit for right beside the BBQ and it doesn’t look like such an eye-sore anymore. It’s great for holding sauces, brushes, plates…or, if you are my husband, a beer!

Putting the table to work beside the BBQ

So, there you have it — a drab outdoor side table turned fab outdoor side table! Considering we sold the patio table and chairs for the same price that we bought them, but kept the side table, this project practically nets out to $0! My wallet and I love it!

What’s your favourite spray paint project? I’d love to hear about it!

Linking up with:
I Heart Organizing
Remodelaholic
Thrifty Decor Chick